Sunday, 31 January 2016

Navara Terrano 2.7TD conversion

Hello, my Navara has blown up one too many times and now I am going to do what I should have done in the first place. That is fit a Terrano II  2.7TD engine.


I bought this truck knowing they had a sword of Damocles hanging over them, but this one had a recently reconditioned engine which I assumed would last over 100,000 miles that the original engine had. 3 months later the engine started making a dreadful noise, so we stopped and were recovered home. I removed the engine and stripped it down but could find no obvious fault, just a bit of wear on the big ends. Nowhere near enough to cause so much noise.

I had been researching these trucks for a while and the consensus of opinion seemed to be that upgrading the YD engine would be the better option over a conversion. £500 later I had fitted the upgrade parts from Billcar. Shells, con rod bolts, oil pipe conversion and a new oil pump.

A couple of thousand miles later more noise this time definitely from the top of the engine. On inspection all I could find wrong was a tooth missing on the timing chain sprocket which caused the chain to tighten and go slack. So two new sprockets and its running quite and smooth loads of power, great...

Now a month later its gone bang again,this time I haven't the will or energy to look but there is no compression so I suspect there are some nice round holes in the pistons. I am not wasting any more time or money on this engine, when I have finished the conversion I will strip it and sell the good parts in as many different places I can so there is no way it could ever get back together again.

I have been looking allover the internet for advice or information about this conversion I know it can be done because everything  is possible with a bit of determination. The advice that I could find was contradictory and dispersed, a bit here a bit there and not always relevant. So I am going to record how I get on, maybe that will help someone.


Saturday, 30 January 2016

The Plan

I have acquired a Nissan Terrano II, this should supply me with all the parts I need. I have read that you need to fit an older mechanical injector pump to the Terrano engine so that the ECU and other tiresome electrics are not a problem.

My thinking is, that this mismatch, although it will work will give less power and poor fuel consumption.

The Terrarno engine runs perfectly in the Terrano as it is. What if when I fit the 2.7TD in the Navara I make the engine think its still in the Terrano. I have an idea how to do this but we will have to see how hard it is to achieve and even if its possible.

First job is to get the engines out and see the differences when they are side by side for myself.I will the decide whether to make a hybrid gearbox or use the Terrano box  as is.

Friday, 29 January 2016

Navara prep


Preparation of Navara ready to take out the engine and gearbox as one unit.


 As you can see a bit of modification to the bodywork by cutting out the slam panel.The loom and other parts will tie down out the way. As I remove the electrical connections I am labeling and photographing them.I will pull the Navara engine loom to one side for study when the engine is out.


Its fascinating to find that the bumper is only held on by 4, 8mm bolts some rust and a lump of good hard mud. I took the headlight out thinking there would be some fixings underneath. Looks the biz though. Theoretically the engine and gearbox should come out together which as I am on my own will make life a lot easier. Ok next job underneath to remove the front axle, drive shafts and lower the front suspension torsion bars and cross beam.


Thursday, 28 January 2016

Donor Maverick

My donor vehicle has now arrived and is awaiting my attention, it's a Ford Maverick and is in surprisingly good condition.The front wings are rusted but the rest seems fine. I know this car was retired due to a faulty clutch, which is a major job on these as I am finding out. As I am dismantling all the engine and drive train anyway its no problem now.


Its a terrible shame the Navara wasn't made as well as this. There is loads of rust starting to eat away at the Navara the bumper back support is just rust and dust.

Wednesday, 27 January 2016

Navara YD25 engine out

So, decided to take the engine out without the gearbox, mainly because I was worried about the combined weight and possible balance problems. I have learnt from my first battle with the Navara  to remove the engine mounting blocks which allows you to lower the engine sufficiently to get at the top bell-housing bolts which are fiddly especially when you are on your own.


Removing the slam panel made removing the engine much easier. I unbolted the turbo at the manifold and left it in the engine bay, the rest of the exhaust down pipe looks pretty rusted. It will be easier to deal with when the engine is out of the way. I think I will use the Maverick down pipe so doesn't really matter at the moment.


Looks sweet enough, but this engine has cost me a small fortune in time and money. I will dismantle it later and see what parts are still OK. The lower engine is fine, I think the top has destroyed itself, the temptation to look is very strong but as I have said, enough time has been wasted on this already.

Tuesday, 26 January 2016

Maverick prep

I am pleased to see how many similarities there are between the two, so far the Maverick seems to be the better built. I started her up just so that I know she is a good runner before starting the strip down, now it will be my fault if she doesn't start when in the Navara. The Maverick has air-con so a few more bits to remove and annoyingly no radiator drain plug.


Sunday, 24 January 2016

Dismantling a Maverick

I take back everything bad I have said about the Navara, after 3 hours the engine was out. 6 hours spent on the Maverick and still not ready to lift out. The front axle and diff was a real struggle, every bolt was tight to the end and hard to get at. The torsion bars are further forward and closer together than on the Navara which make the front axle a tight fit.I read the workshop manual when I got home to find you should lift the engine to make more room, a case of. "If at first you don't succeed, read the instructions."  On the Navara this job was a doddle.

The 4 wheel drive selector is being a pain it's completely rusted and looks as if it came off the Titanic last week. I hope the selector from the Navara fits which has been modified and is much better, no rubber boots to hold any water.

Navara gearbox out

The gearbox comes out today, I have been dreading undoing the mounting bolts they look well rusted in,but a good soak with WD40 and they all came undone easily. Looking at the torsion bars I thought that I could lower them as a unit just enough to get the gearbox cross-member off. This is the case just removing the torsion bar cross-member bolts and levering it down I was able to twist the gearbox mounting free. Now the gear sticks and electrical connections and ready to go. Then I found the breather pipes ho hum.


Torsion bar just low enough to get the gearbox cross member of.


A point that may help if you haven't done this before is that the balance point is where the gear sticks are, would have been nice to know earlier. Looks wrong but that transfer box must be heavy. Got the turbo and exhaust out the way now there is some room, just a tidy up now and start on the Maverick same job all over
.


Friday, 22 January 2016

Maverick engine out

Phew!

I sure am glad I haven't got to put this one back in the Maverick. The engine and gearbox came out as one,a bit of a fiddle on your own but doable. I hoisted the the engine at the rear lift point and the unit balanced perfectly.

Looks a bit sad now, then the donor usually gets the raw end of the deal.


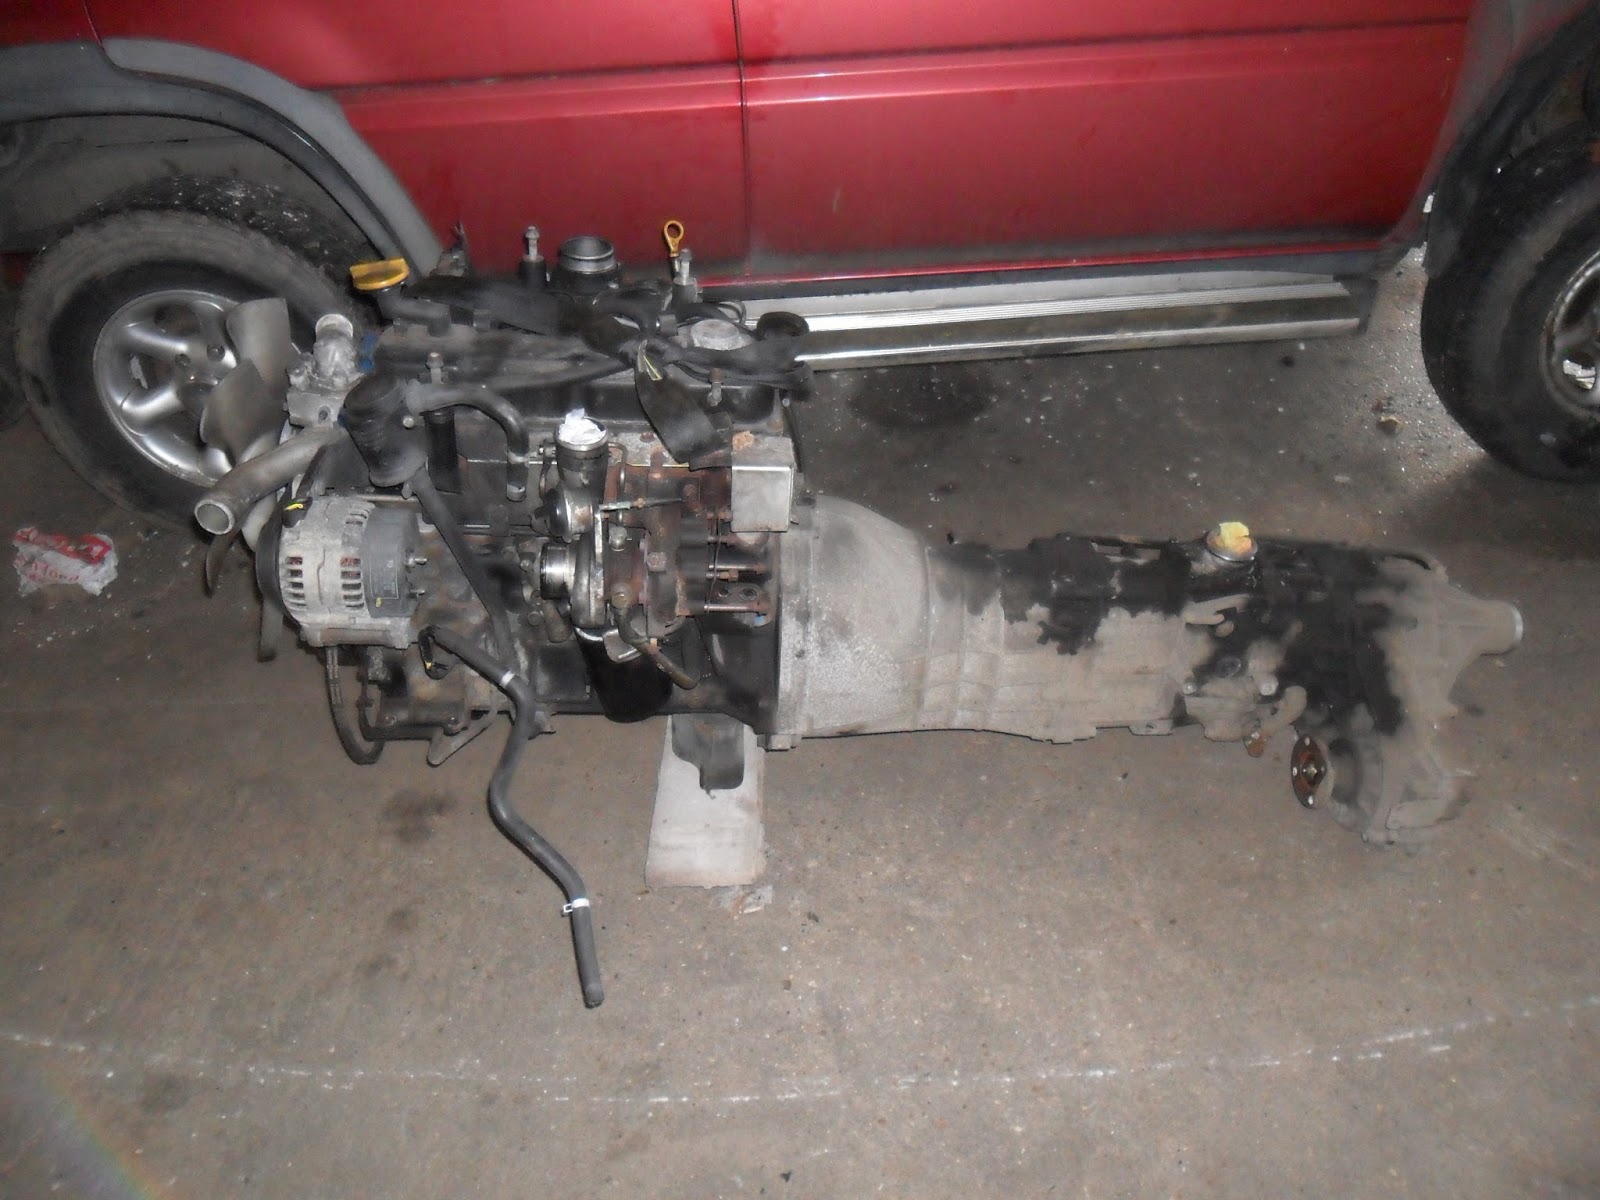
27TD engine and gearbox ready for a new clutch and a clean up.

Preparing 2.7TD and Gearbox

Both gearbox's are identical, at least on the outside. I have decided to use the Maverick gearbox and fit the modified Navara gear 4X4 selector and electronic speed sensor and mountings. The Maverick box is short one switch near the gear stick, as I am using the Maverick ECU to run the engine there should not be any issues.

On investigation the clutch problem was a sticky spigot bearing rather than a worn plate.Changing the clutch is such a big job it would be silly not to fit a new one at this stage. I had a small hope that the Navara clutch which doesn't have many miles on it would be the same. Almost but not quite. A few more quid in the Navara money hole, its getting close to the "is it worth it point" hopefully I will only need service items now to finish.


Thursday, 21 January 2016

Hard bit over

The 2.7TDi engine and gearbox is now in the Navara and looks at home. I used the Navara gearbox mounting and cross member the Navara  prop-shaft fitted perfectly. The 2.7TDi engine mountings fit straight on to the Navara chassis mounting points, there is even a threaded hole in the front of the mounting the same as the Maverick. The only other bit I changed over from the old Navara engine is the vacuum pump pipe which means the pipe will fit perfectly onto the Navara system, as if it's always been there. The power steering looks as if it might be more involved but that is for another day.


Fitting the engine and gearbox together was a lot easier than fitting the engine and gearbox separately, it just went in like it wanted to be there.


Tuesday, 19 January 2016

Navara reassembly

Putting it all back together now,

Navara alternator fits straight on using 2.7TD bolts,the Navara alternator has a double pulley which I left, the belts seem to line up OK. I have connected the Navara wiring.

I have fitted the Navra starter circuit to the 2.7TD and the Navara gearbox loom to the Maverick box.

The other Navara engine electrics I have left to one side for the moment. I hope to run the engine with the Maverick electrics and ECU and let the Navara do the rest.

I have used the Maverick power steering pump with the Mavirick oil supply pipe and the Navara high pressure pipe. I had to reroute the pipe in a backward loop but it fits OK I will make a new support bracket to stop any vibration.
Power steering pipe looped around and fitted on to the 2.7TD pump

The fuel pipes a close enough to fit using the Navara pipes I just removed the Navara leak off pipe as the 2.7TD leak of goes back to the pump.

Little things are the most annoying like the heater pipes are different sizes so will need modifying, but the Maverick exhaust when straight on, matching perfectly with the Navara system.

The Navara high/low range gear-stick fits straight on and is better than the old Maverick one.


,

Puzzling over the radiator now, seems the fan is now a bit to the right and the cowl will not fit. I think I will put the bonnet back and see if the taller Maverick rad will clear with a bit of fiddling the hoses will  look better with that option to.


Saturday, 9 January 2016

Maverick loom

The Maverick rad did not fit very well it was just touching the bonnet, so I will use the Navara rad and make a neat metal pipe to run along the top of the rad to create an outlet for the top hose on the other side of the rad.

I removed the wiring loom from the Maverick, wasn't such a bad a job. I just had to keep telling myself that most of the loom will be surplus to requirements and I won't have to find a home for all of it in the Navara. I plan to use just the bits essential to make the engine run, the annoying thing is going to be the NATS system which will mean I have to use more parts of the loom than otherwise. The Maverick accelerator is different, older technology they both do the same thing so they might be interchangeable. Will have to wait and see if the Maverick ECU will recognize it, not that big a job to switch them over if not, plus it will be running by then and I will be in a good mood.


Maverick wiring loom

A few hours and a wiring diagram should see this sorted I will leave every thing attached until it is running and then remove each unused section at a time, I can then adjust the lengths to make a neat fit. I am hoping to connect the oil pressure, temp and fuel filter senders to the Navara ECU but I don't yet know how this will behave, hopefully if it gets the correct information it should think everything's OK.

Friday, 8 January 2016

Getting it running

I might have been a bit optimistic thinking I could reduce the wiring loom using the workshop manual, there are just too many things to worry about. So I will forget the wiring diagram and use logic.


I have wired up the engine using the Maverick loom which I just draped over the Navara roughly where it was in the Maveric. I fitted all the components that I think its needs to run and some I am not sure about. I used the Navara loom to the alternator, starter and gearbox all the other sensors and injector pump are wired using the Maverik loom and ECU.

Maverick loom;

  • ECU
  • Engine sensors and injector pump
  • Ignition switch and NATS coller
  • Accelerator pedal 
  • Immobilizer box
  • Radio signal box
  • Super lock box
  • Dashboard
  • All the relays and fuses
  • Glow plug relay
  • Several other small box's and relays I haven't a clue what they are.


I fitted a live to the alternator cable on the maverick loom and fitted all the earth wires I could find, when the Maverick ignition key was on all the dash lights worked, of course wouldn't start with this key. However a quick flick of the Navara key and she was away, tick over and high speed all the Maverick dash lights out except the engine warning light, no surprise there. The Navara glow plug system was working so could possibly use it for the 2.7TD something to experiment with later.

Now I can start paring back the unused part of the loom a truly daunting task because if I cut a required wire it will be a job to reinstate it. Things like the light circuit and any empty plugs can be safely cut and pulled through. I kept test starting her every so often and before and after removing any relays. Now the loom to the ECU is a manageable size and will fit in nicely.

I plan to fit the ECU at the rear of the n/s inner wing there is quite a bit of space on that side of the truck I hope that I can reroute the rest of the parred down loom and relays to this area for neatness, I will try to make some sort of water resistant bag to keep it all dry just in case the truck goes swimming one day.


A bit of a birds nest at the moment but is changing dramatically as the unused wires are pulled out.


A few other small but fiddly jobs, the Maverick air cleaner bracket has to be slightly modified almost fits but not quite and I am making a steel pipe to move the top hose over, this will also act as a fan guard as the plastic one won't fit now. I bolted the slam panel back in place I welded some extensions on each end, its so much easier to work on if you can remove it, might help someone in the far future.


Should look quite neat when finnished

Sunday, 16 August 2015

Fiddly bits

The top hose pipe I made fits well and looks neat, as I hoped it also acts as a fan guard. I modified the air filter mounting from the Maverick so the Maverick air cleaner now sits comfortably in the Navara engine bay. It needs to be lowered by 10mm and the filter mounting holes moved closer to the engine by about 25mm.


So its all running now, just a final tidy up and wire the Maverick engine loom into the Navara ignition.


These are the Navara electrics that I am using, all the connectors are a straight fit onto the 2.7TDi engine except the glow plugs.

  • Glow plug system
  • Charging system
  • Oil pressure sender wires
  • Starting system
  • Gearbox loom
Navara bits NOT used;

  • Injector pump loom, just tucked out the way.
  • Accelerator pedal.
  • Engine sensors

Maverick electrics used;

  • ECU
  • Engine Loom
  • Ignition switch and related NATS parts.
  • Accelerator pedal, needs slight modification to mounting.


Modified Maverick pedal assembly, shortened, new lower mounting holes drilled and the top mounting leg from the Navara pedal welded in place.


Saturday, 15 August 2015

More fiddly bits

The accelerator pedal looks like it's always been there, I routed the wiring from the Maverick loom through the unused air con evaporator holes behind the heater to the drivers side and connected to the pedal, I had to supply a new ground wire as the Maverick loom ground was too short then I refitted the air con cover. Looks neat and tidy.

I have left all the original Navara connections in place just in case they are needed one day.

I have found an ammunition box that is perfect to store the Maverick relays, fuses and ignition barrel along with any spare loom.I had intended to cut the loom down,but as it's tucked away nicely now I will leave it alone, it will be much more reliable without all those extra joints to potentially fail.


Ammo box is fixed where the second battery would be, everything fits in perfectly nice and tight so there will not be any movement. I cut a hole for the loom to the engine and ECU which I will make a silicon bung for when the truck has proven its self reliable, the ammo box lid has a good seal so it should keep everything nice and dry. The jump lead is a temporary live while in the test stage, I will connect this to the Navara ignition circuit so that the \maverick system becomes live with the Navara switched on.


The finished engine bay, you can hardly tell its the wrong engine. I have re-covered the maverick loom in red tape just to make identification of the two systems easier the data link for the Maverick is in the ammo box. It will be easily found by any one tracing the loom, I think I might paint a message on the lid as well to help future owners.

All the Navra electrics seem to work, the speedo and 4 wheel drive lights, the door locks and windows. The tachometer and a couple of other dash lights and the temp gauge do not work and of course the engine management light is on. I have run it up to temp for about half an hour and its seems fine, I can't wait to get the front axle back and go for a test drive. 


The Maverick ECU waiting for a tidy up and fixing in place. I plan to paint several layers of mould making latex over the top and create a water proof seal that will pull of when servicing is required. There are a few extra wires still to sort these should relate to the dash board lights and gauges, I can sort these at my leisure as I can live without a few lights for a bit. The loom runs under the air filter into the ammo box looks very neat and tidy.  


Sunday, 12 July 2015

Finishing off


I had trouble finding an ignition live to power up the Maverick ECU, I used a red wire from the ignition relay in the end. The only problem is a short delay switching off the engine, I will work on that one, just that this wire was easy to get at and the only one that I could find that stayed live when starting. I have got to find the rev counter and water temp wires from the Maverick ECU and try them in the Navara dash, then everything should work except the engine management light.

How many hours have I spent on this project, I would have to guess 95 spread over the last couple of months The mechanical side has been straight forward although having to do everything twice was tiresome. I suppose if you bought every thing you needed already removed from a donor that would be easier, but I suspect a lot more expensive. I will make a list of the bits I used in another post.

The electrics have been a greater challenge, mainly the fear of cutting an important wire or sensor. But working slowly and methodically with constant testing it has been successful, only time will tell about reliability. At the end of the day I can still fit a mechanical pump if this set up proves problematic.

It has been my aim to keep the costs as low as possible, I will recover my investment by selling the old Navara engine gearbox and unwanted ancillary's and of course the Maverick still has a scrap value, I should be a couple of hundred up on the deal and have a usable and unblowupable pickup. I am lucky I have not had to count my time in monetary terms, though there is a long list of other jobs that has built up.

My advice to anyone thinking of a project like this, if you are confident with your mechanical skills and can modify some brackets the engine change is quite straight forward. However it gets a bit harder with the electrics, I spent a long time on this section. Removing the maverick loom took a day and trying to workout which bits to use on the bench with a wiring diagram wasted a few more hours. So don't try to work it out just connect it all in and them slowly remove components whilst constantly testing. When it fails to start put that bit back and mark it necessary. Eventually you will end up with a much smaller and lighter loom which will tuck away neatly.

Sunday, 14 June 2015

£$%*%$ Computers

So, I have finally given up on trying to run this with the electric injection system, although it was running fine this did not last and has proven beyond my skill and patience to continue with it and make it reliable.

This is really annoying because there is no obvious reason why, all the sensors and switches have been wired in. But I keep getting malfunction codes they keep changing, now the ecu has shut down and wont reset. It has beaten me so I hope it's happy now, living on the scrap heap.


Saturday, 13 June 2015

On The Road

At last,on the road. I have used a mechanical injector pump taken from a TX1 Taxi, a really fiddly job replacing the pump. With hindsight I should have taken the inlet manifold off, would have made life easier. The pump it's self was easy to fit and time up, the engine started first go, once the air was out. I have keep the standard injectors and turbo setup, it runs sweet with no smoke, even when accelerating hard.

It's hard for me to tell what the driving difference is as I did not drive it much before the conversion and then only carefully as I was always worried it would blow up.Which it did.

It is certainty quieter with this engine even though its an older push rod design and drives very smoothly. Any way it can keep up with the other traffic OK so that's good enough for me. I am now checking the fuel consumption, so fingers crossed it's good because that will be the deciding factor whether or not I keep it.

So all that time and effort trying to get it running with the Maverick ECU was wasted, but to be honest I feel much better now it has the mechanical pump so much less to go wrong. The only thing not working properly is the engine malfunction light, I think I will keep it to remind me of all that work. The rev counter works fine I just wired the Maverick Flywheel sensor straight to the Navara sensor connector I kept the shielded wire in place just in case, in reality there are only 2 wires as the Mavericks 3rd wire connects back to one of the others via a shield wire. The temp sensors are the same and the Navara glow pug system works fine although a bit slower when cold.

Thursday, 11 June 2015

Living with a Maverick Navara

Well I have been using the truck for a while now and enjoying it, the truck is returning  28 mpg average use which is less than I had hoped but better than I feared.

I loaded up with about 750kg today and seemed unaffected by the extra weight other than having a less bouncy ride. A real test will be towing a heavy trailer which is a job coming up soon. The truck is probably a bit slower and slightly less economical but this is outweighed by relief from the constant worry of it blowing up. It is also much quieter now especially on startup and when cold.

All in all if you did not know it had been converted you probably couldn't tell, all the electrics work the same and the engine bay is neat with only small clues to the change that only an experienced person would notice. As I have wired it into the ECU loom to power the injector pump the NATs is still effective at immobilizing the engine should anyone try without the key.